The Balance Method, created by Dr. Richard Teh-Fu Tan of San Diego, California, is an innovative acupuncture system that simplifies complex principles of classical Chinese medicine into a practical and results-driven approach, particularly for pain management and various clinical conditions.
This acupuncture system emphasizes balancing the meridians to enhance healing throughout the body. Known for its immediate clinical effectiveness, the Balance Method is grounded in Traditional Chinese Medicine (TCM) meridian theory and draws from classical acupuncture texts such as the Neijing and the I Ching.
To learn the Balance Method, there is no better resource than its esteemed creator. Start today with one of Dr. Tan's recorded lectures!
Dr. Tan's "Acupuncture 1, 2, 3" serves as a fundamental guide, providing a practical application of his Balance Method. This approach simplifies the complex theoretical foundation of the Balance Method into an easy-to-follow three-step protocol. It is accessible for beginners and highly effective for experienced practitioners. The protocol assists in selecting effective distal acupuncture points to treat a variety of clinical conditions, particularly in pain management. By maximizing treatment outcomes while using fewer needles, this method minimizes the risk of aggravating local pain areas.
Read below for the details of the three steps.
The first step involves diagnosing the affected area or meridian where the patient experiences pain or dysfunction. For example, lateral knee pain may indicate Gallbladder meridian imbalance, while shoulder pain could involve the Large Intestine, Small Intestine, Lung, or Triple Heater (San Jiao) meridians.
It is important to note that the area of pain may follow a single meridian, span across multiple, or reside between meridians. Therefore, this step requires a thorough understanding of meridian anatomy and the symptoms associated with them, ensuring that the practitioner accurately identifies the "sick" or problematic area. This initial diagnosis is crucial for the effectiveness of the treatment, as successful treatment relies on an accurate diagnosis.
Once the sick meridian is identified, the practitioner chooses a meridian to treat that will restore balance to the body.
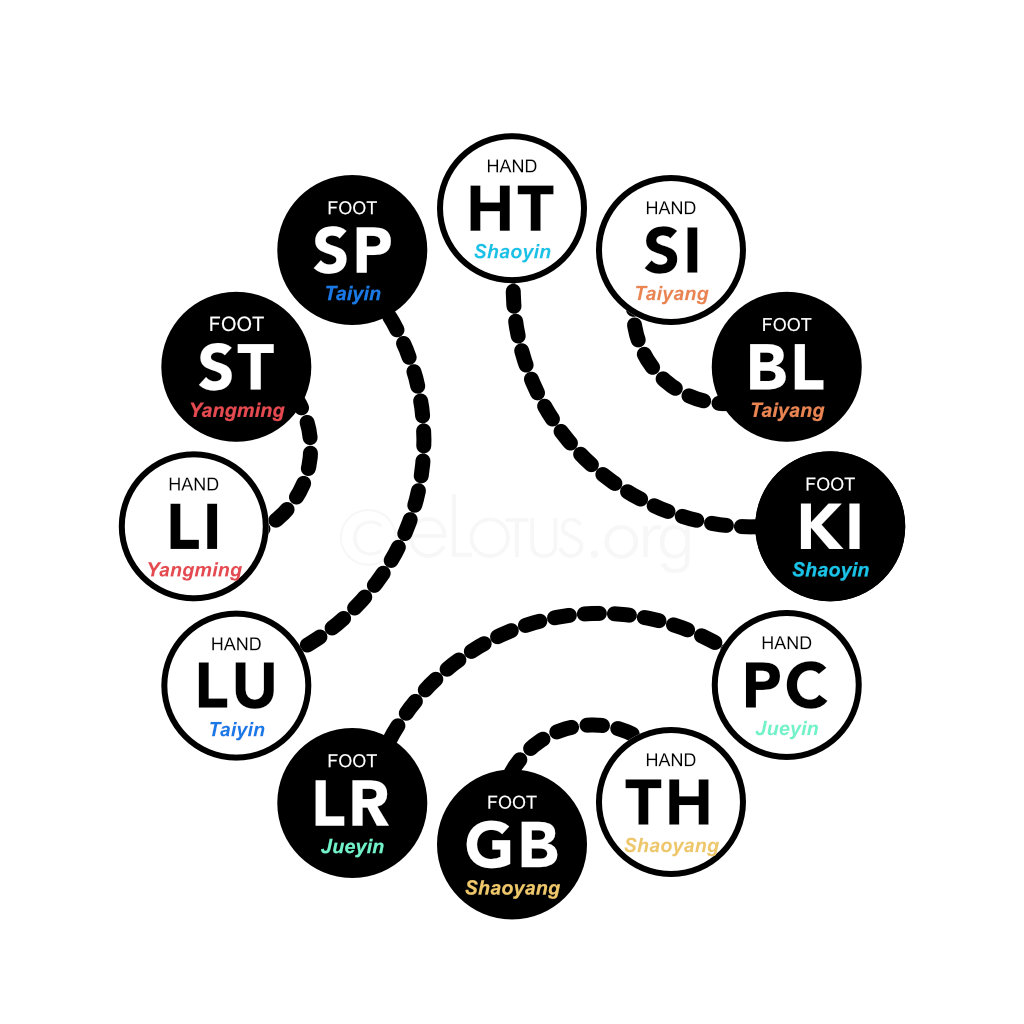
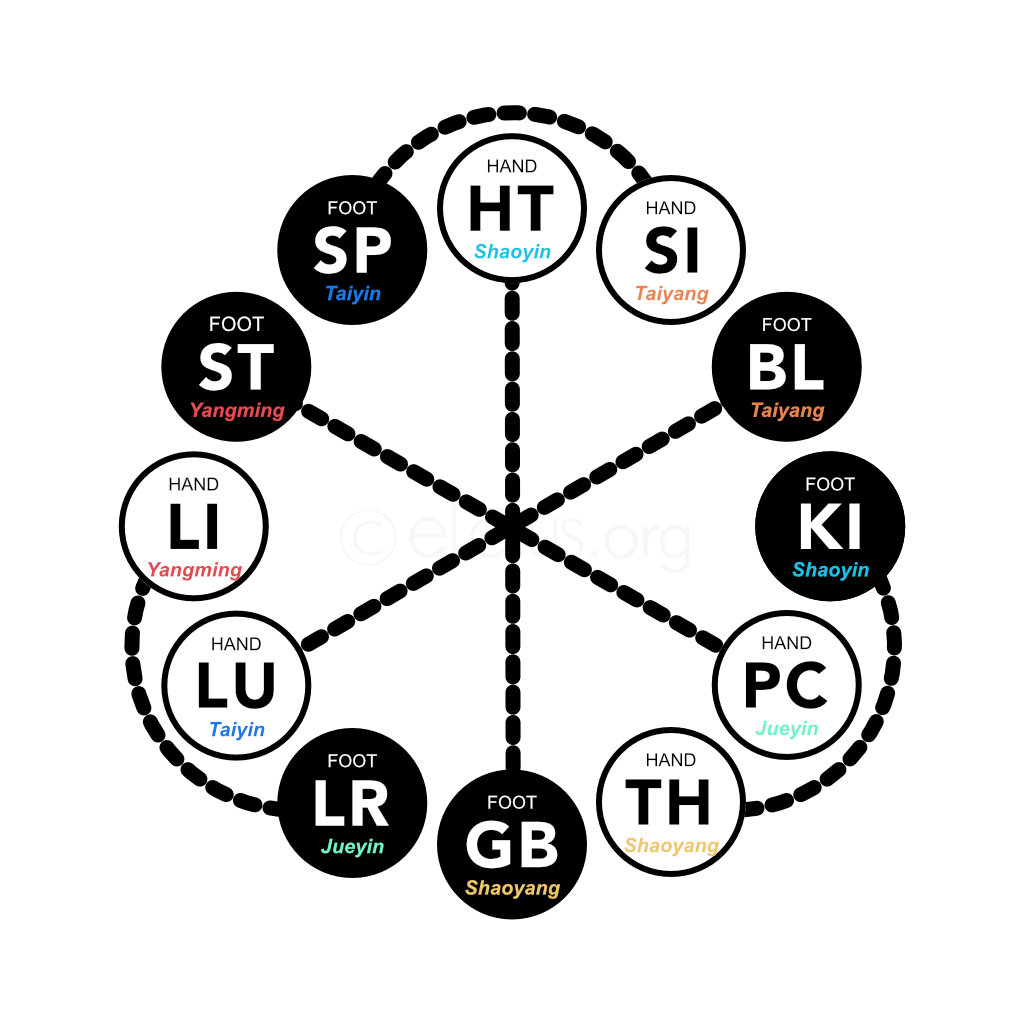
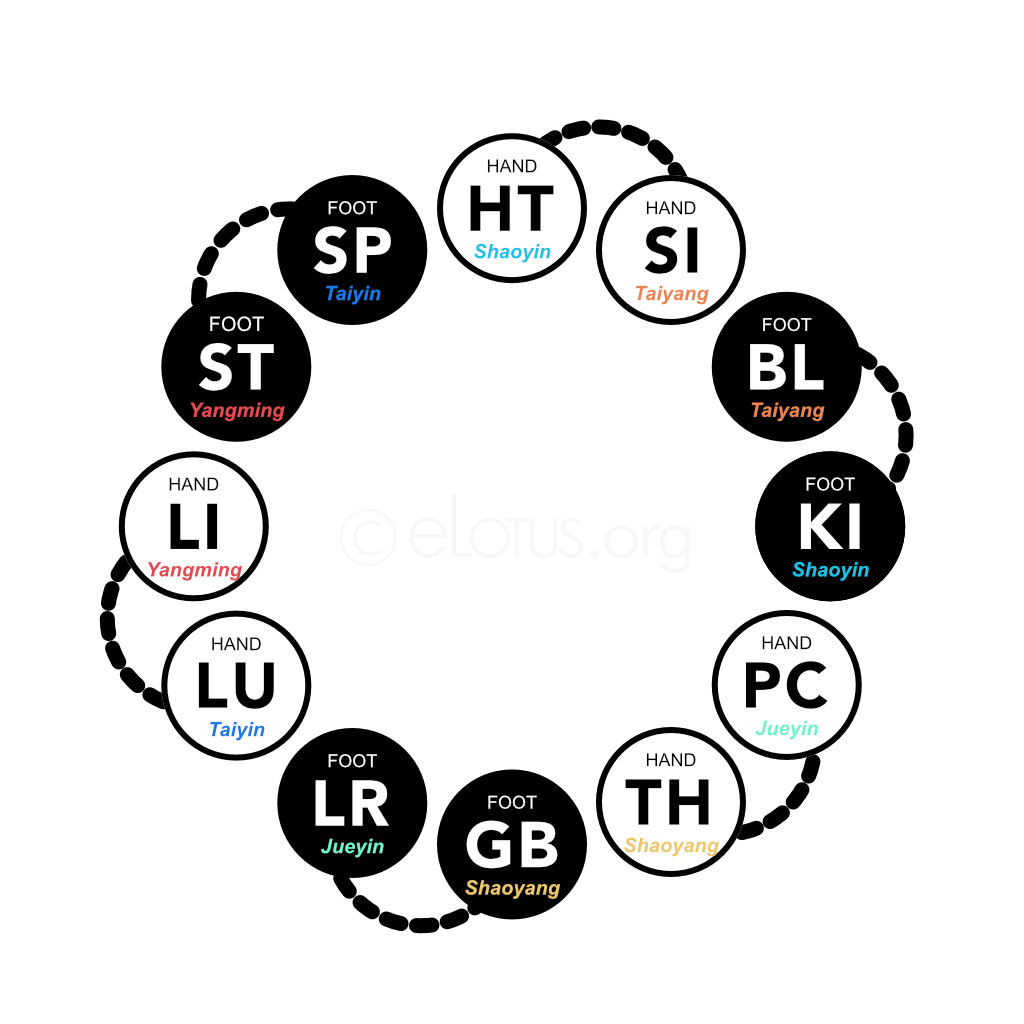
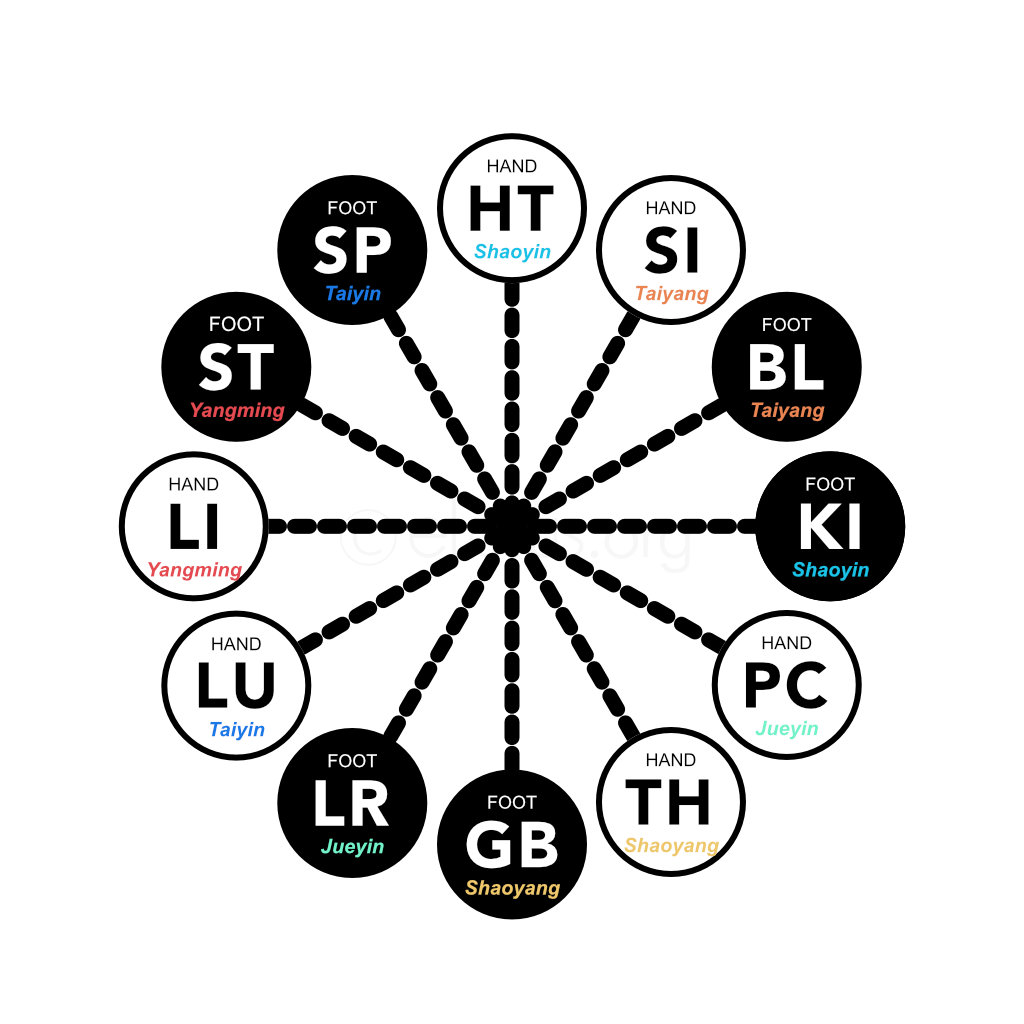
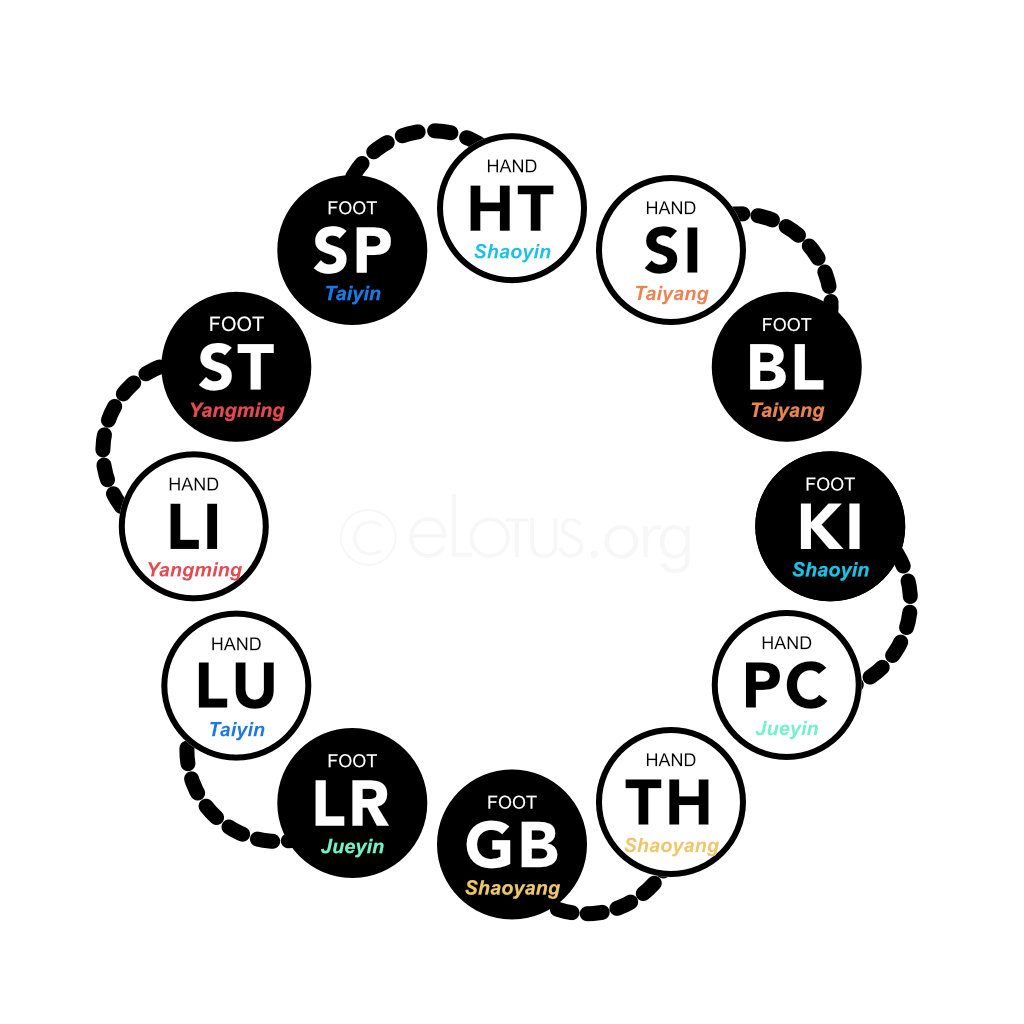
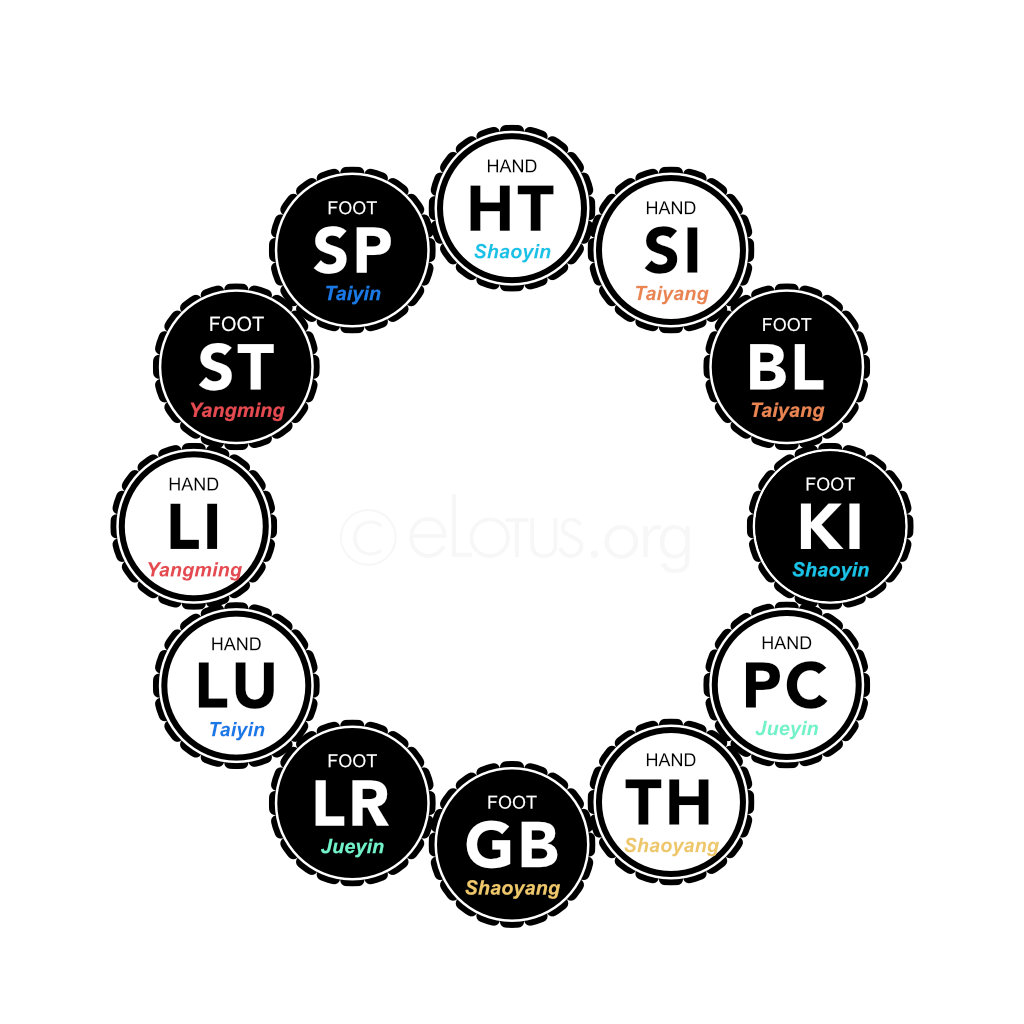
This selection is guided by Dr. Tan’s Five Systems (sometimes referred to as Six Systems), which are derived from classical TCM relationships. These systems provide a framework for selecting the appropriate meridian to harmonize and balance the sick meridian, ensuring a holistic and dynamic treatment that enhances treatment efficacy and optimize patient outcomes. These systems include:
| Sick/Affected Channel | System 1 | System 2 | System 3 | System 4 | System 5 |
|---|---|---|---|---|---|
|
LU Hand Taiyin |
SP | BL | LI | BL | LR |
|
LI Hand Yangming |
ST | LR | LU | KI | ST |
|
ST Foot Yangming |
LI | PC | SP | PC | LI |
|
SP Foot Taiyin |
LU | SI | ST | TH | HT |
|
HT Hand Shaoyin |
KI | GB | SI | GB | SP |
|
SI Hand Taiyang |
BL | SP | HT | LR | BL |
|
BL Foot Taiyang |
SI | LU | KI | LU | SI |
|
KI Foot Shaoyin |
HT | TH | BL | LI | PC |
|
PC Hand Jueyin |
LR | ST | TH | ST | KI |
|
TH Hand Shaoyang |
GB | KI | PC | SP | GB |
|
GB Foot Shaoyang |
TH | HT | LR | HT | TH |
|
LR Foot Jueyin |
PC | LI | GB | SI | LU |
We have integrated Dr. Tan's five systems into the Master Tung Acupuncture section of our website (premium CORE content). Now, if a Master Tung's point has a corresponding meridian based on Dr. Tan's systems, Gold Pass members can quickly identify the meridian and the channels a Tung point treats when exploring the point on our website.
Harness these powerful resources to enhance your learning and elevate your practice to new heights.
Explore Master Tung Acupuncture Points

The final step is to identify the best locations on the balancing meridian for needle insertion to achieve optimal treatment results. Based on Dr. Tan's Strategy of Twelve Magical Points, effective point selection relies on the principles of mirroring and imaging. These principles highlight the body's interconnectedness, where pain in one area can trigger tenderness, weakness, or tightness in other distant regions. By addressing these projected areas, you can restore balance and heal the original source of pain.
To effectively treat the source of pain, apply the principles of mirroring and imaging to identify target areas of the projected pain (which can manifest as tenderness, weakness, or tightness) for needle insertion. For the best outcomes, palpate for ashi points instead of directly using standard acupuncture points in the projected area.
Apply the mirroring principle to locate points on a limb to treat pain originating from another limb. Mirroring uses the upper limb to balance the lower limb, and vice versa. Refer to the following charts for the mapping between upper and lower limb areas through mirroring and reverse mirroring.
| Upper Limb | Lower Limb |
|---|---|
| Fingers | Toes |
| Hand | Foot |
| Wrist | Ankle |
| Forearm | Lower Leg |
| Elbow | Knee |
| Upper Arm | Thigh |
| Shoulder | Hip |
| Upper Limb | Lower Limb |
|---|---|
| Fingers | Top of Hip |
| Hand | Hip |
| Wrist | Hit Joint |
| Forearm | Thigh |
| Elbow | Knee |
| Upper Arm | Lower Leg |
| Shoulder | Ankle |
Apply the imaging principle to locate points on a limb to treat pain originating in the head and trunk, and vice versa. Through imaging, areas in the head and trunk can balance either the upper or lower limbs; likewise, the upper and lower limbs can balance areas in the head and trunk. Refer to the following charts for mapping head and trunk areas to the upper or lower limbs.
| Sick Area | Needle Area |
|---|---|
| Testicles and anus | Fingers |
| Genitals, coccyx, sacrum | Hand |
| Bladder area, lumbo-sacral area | Wrist |
| Lower abdomen, lower back | Forearm |
| Umbilicus level, L2, waist area | Elbow |
| Upper abdomen, rib cage, chest, mid-upper back | Upper Arm |
| Neck, jaw, base of skull | Shoulder |
| Top of head | Top of Shoulder |
| Sick Area | Needle Area |
|---|---|
| Testicles and anus | Toes |
| Genitals, coccyx, sacrum | Foot |
| Bladder area, lumbo-sacral area | Ankle |
| Lower abdomen, lower back | Lower Leg |
| Umbilicus level, L2, waist area | Knee |
| Upper abdomen, rib cage, chest, mid-upper back | Upper Leg |
| Neck, jaw, base of skull | Hip Joint |
| Top of head | Top of Hip |
| Sick Area | Needle Area |
|---|---|
| Shoulder | Top of Head / Baihui (GV 20) |
| Upper Arm | Forehead Level |
| Elbow | Eye, Ear, Occiput |
| Forearm - Upper | Nose Level |
| Forearm - Lower | Mouth Level |
| Wrist | Chin Level |
| Sick Area | Needle Area |
|---|---|
| Hip | Top of Head / Baihui (GV 20) |
| Thigh | Forehead Level |
| Knee | Eye, Ear, Occiput |
| Lower Leg - Upper | Nose Level |
| Lower Leg - Lower | Mouth Level |
| Ankle | Chin Level |
The following chart provides a list of acupuncture points that correspond to specific body parts based on the Hologram Theory. Use these points as a visual reference to accurately locate the appropriate point for needling.
To illustrate how the three steps in Acupuncture 1, 2, 3 apply, below we present a case of a patient seeking treatment for lateral knee pain.
Lateral knee pain typically involves the Gallbladder (GB) meridian, as it runs along the lateral aspect of the leg and knee.
Choose from the following balancing meridians to treat pain in the Gallbladder (GB) meridian:
| System | Balancing Meridian | Side to Needle |
|---|---|---|
| System 1 | Triple Heater (TH) | Opposite |
| System 2 | Heart (HT) | Either |
| System 3 | Liver (LR) | Opposite |
| System 4 | Heart (HT) | Either |
| System 5 | Triple Heater (TH) | Opposite |
| (System 6) | Gallbladder (GB) | Same |
Using the mirroring method or imaging method, select acupuncture points on the balancing meridians that correspond to the knee's anatomical location.
With mirroring, the knee maps onto the elbow, therefore for lateral knee pain in the Gallbladder (GB) meridian, point selections are as follows:
| Balancing Meridian | Point Selection | Side to Needle | System |
|---|---|---|---|
| Triple Heater (TH) | Ashi points around TH 10 or TH 11 | Opposite | System 1, System 5 |
| Heart (HT) | Ashi points around HT 3 | Either | System 2, System 4 |
| Liver (LR) | Ashi points around LR 8 | Opposite | System 3 |
| Gallbladder (GB) | Ashi points around GB 33 | Either | (System 6) |
We've curated a list of acupuncture prescriptions created by Dr. Tan that can address a wide variety of health concerns, featuring thoughtfully selected acupuncture points that promote healing and restore balance. Start using these powerful protocols today to enhance your skills and elevate your clinical practice with this transformative approach.

Dr. Tan collaborated with eLotus and meticulously documented his acupuncture prescriptions for over 500 symptoms and diseases. Discover these essential prescriptions in the Balance Method section of the eLotus Clinical Manual of Oriental Medicine—an invaluable resource that’s free for eLotus members. Empower your practice and expand your expertise today!
Gain FREE access to the eLotus Clinical Manual online with any course registration (find link on course page)!